I started school two weeks ago. I'm a drama major entering into my sophomore year. It's amazing how time has gone so fast. I remember being a scared timid college freshman like it was yesterday. As a sophomore, I feel more comfortable with myself as a person and as an actor. I still have a lot of improving to do, as there will always be room for more self-improvement. Things are slowly changing, just as the leaves change colors. The weather is getting colder, the night is getting a bit darker, and leaves are covering the floor. I can't wait for fall to arrive. I love the cozy feeling of fall. I get to wear fluffy scarves and slouchy shirts. I get to jump in piles of leaves. Plus, I get to drink all the warm tea and pumpkin spice lattes I want. Can you tell Fall is my favorite season?
Sunday, September 16, 2012
Saturday, August 18, 2012
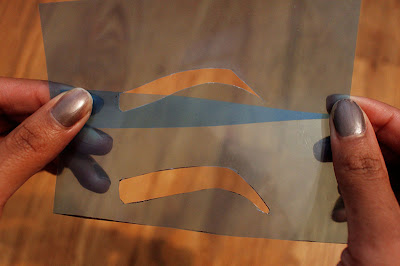
DIY Eyebrow Stencils
What you'll need
- Contact paper
- Binder separator
- Needle or pin
- Scissors
- Permanent marker
- Pen
- Eyebrow brush
- Angled brush
- Mascara brush
- Long paintbrush
- Eye shadow to fill in eyebrows
- White Eyeliner
- Tweezers
- (Not shown) A nail file.
- Brush
eyebrow hair using an eyebrow brush.
- Outline
your eyebrow using a long paintbrush or pencil and white eyeliner. Line
the end of the paintbrush next to your nostril for the first line, the
outside of your pupil for the second line, and the outer corner for the
third line. Use this chart
as a guide.
- Use
the lines you created to create an outline of the eyebrow shape you want.
- Cover
your eyebrow with the contact paper.
- Trace
over the white eyeliner using a permanent marker.
- Remove
the contact paper and outline your traced eyebrow so that it is neater.
- Using
the binder separator, trace the eyebrow shape.
- Poke a
hole in the separator to create a gap for your scissors. (Optional: Use
the pen to make the hole bigger. Just make sure the hole doesn’t go pass
the black line).
- Cut along the black line. (Optional: For a bolder eyebrow shape, cut outside the black line).
- Fill in your eyebrows using the stencil and tweeze what you didn’t fill in.
Tip: Using a nail file, I filed the inside of the stencil to smooth it out.
Enjoy you're own eyebrow stencils and you're good-looking new eyebrows!
Love,
M
Tuesday, July 17, 2012
Make Your Own Blotting Sheets
I recently ran out of blotting sheets that I got from Sephora. My face is an oily mess, especially during the summertime. Not only that, but my wallet is empty, too. What is a girl to do? My mom bought gift wrapping tissue paper for a birthday party she was going to. Tissue paper uses the same material blotting sheets use to pick up oil. Don't believe me? Check it out.
I cut down the marks I made. Then I cut both ends of the vertical strips.
After that, cut the middle of those strips and, voila! You have multiple sheets.
Now, you're pretty much done. You can just stick these sheets in a small envelope and call it a day. But because I love arts and craft, I made my own packaging for these.
Above is a mark-up of the packaging I made. I cut along the outer black lines and then folded by the inner black lines.
After folding it, I cut the wrapping paper to the size of the envelope and glued it using the decoupage.
I let it dry and then stuck my blotting sheets in there. Now, you're done!
Love,
M
What you need:
Tissue Paper
Scissors
Marker
Ruler
(Optional): Poster board, wrapping paper, decoupage, and a paint brush
Because I'm lazy, I took a sheet of tissue and folded it the way you see up there. I flipped it horizontally and made marks every 3 inches.
After that, cut the middle of those strips and, voila! You have multiple sheets.
Now, you're pretty much done. You can just stick these sheets in a small envelope and call it a day. But because I love arts and craft, I made my own packaging for these.
Above is a mark-up of the packaging I made. I cut along the outer black lines and then folded by the inner black lines.
After folding it, I cut the wrapping paper to the size of the envelope and glued it using the decoupage.
I let it dry and then stuck my blotting sheets in there. Now, you're done!
Love,
M
Saturday, June 30, 2012
Coral and Gold
Coral and gold are one of my favorite summertime color duos. I love how perfect they look together.

I'm coming up with some ideas for this blog and I can't wait to share some of them with you. Hope to update more often (whoops! old habits die hard).
Love,
M
{Credit: CakeCentral // Essie // HintMag // Modcloth}
 |
| Golden vanilla cupcakes with coral flowers in the middle. How creative! I'd be too afraid to eat something so beautiful. |
 |
| I've been wanting to own one of these in so long! |

 |
 |
| Coral dress with a touch of gold from the Alexander McQueen Spring 2012 collection |
I'm coming up with some ideas for this blog and I can't wait to share some of them with you. Hope to update more often (whoops! old habits die hard).
Love,
M
{Credit: CakeCentral // Essie // HintMag // Modcloth}
Tuesday, June 12, 2012
What a busy weekend
This past Friday, two of my friends, Natasha and Vanessa (and me), went to the awesomest (not a word, I know) park ever: Central Park. It was the first time one of my friends has ever been there and I'm quite proud I was the reason she went. We took a detour to Magnolia's Bakery first, because let's be honest, they have the best stuff. Of course I nibbled on Natasha's banana pudding and boy, was it good!
We saw this cute car and I just had to take a picture of it.
(Natasha)
This was the only time Vanessa thought it was ok to smile. The other times... well, not so much.
Afterwards, we went to Times Square and sat on the big red steps. It was then Natasha realized that's where Glee filmed that one episode (the one they went to NY). I'm still upset I missed the filming of that, but I had school work!
Then, I went to Rhode Island, for Florraine's (a childhood friend) graduation. Her mother had a dinner for her family and invited me over. I couldn't resist.
I can't believe how grown she is! Heck, I can't believe how grown I am. We truly are growing up fast.
Love,
M
Subscribe to:
Posts (Atom)


